A dirty bicycle chain can cause a myriad of issues. It can leave grime residue on your clothing or skin, making your rides less enjoyable.
Dirt and grit can cause increased friction on the chain links, leading to accelerated wear and tear of the bicycle chain. A dirty bicycle chain may also cause damage to the derailleurs and drivetrain cogs. Thus, keeping your bicycle chain clean is crucial!
To help you with this task, we’ll be sharing the steps for both a quick and thorough cleaning of your bicycle chain, as well as listing some key issues to look out for and how to fix them. Learn how to clean your bicycle chain and keep it running smoothly!
Table of Contents
How To Quickly Clean Your Bicycle Chain
Conducting quick cleans of your bicycle chains regularly can reduce the need for frequent deep cleaning and ensure that your rides are smoother. Since it requires less time, you can do this just before or after a ride, or even while you’re on the go – all you need is a clean, lint-free cloth and some bicycle lubricant!
Note!
A bicycle lubricant is applied after cleaning to keep the bicycle chain running smoothly. It also prevents corrosion and reduces friction, which in turn slows down wear and tear. Bicycle lubricants include both greases and oils.
On the other hand, a degreaser is applied during cleaning to remove the dirty lubricant from the drivetrain.
For a quick clean, follow the steps below. Note that you won’t have to remove your chain to do this.
- Wrap the clean cloth around the bicycle chain.
- Backpedal the drivetrain through the cloth.
- Stop to check if the cloth is dirty. If it is, change to a clean part of the cloth.
- Continue backpedalling until no more grime is left on the chain.
- Finally, apply bicycle lubricant as needed.
Note!
For this quick clean method, avoid using a cloth soaked in degreaser. While it may appear to clean your bicycle chain, it can cause your degreaser to mix with the dirty lubricant instead of removing it.
How To Thoroughly Clean Your Bicycle Chain
Occasionally, a more thorough cleaning is required to keep your bicycle chain functioning well.
What you will need:
- Bicycle degreaser or Selleys RP7
- 3 pieces of cloth
- Brush
- Water
- Bicycle lubricant
Note!
While a clean bicycle chain is good, be careful not to overclean it! Overcleaning can strip off the factory lubricant, shortening the lifespan of the chain.
Step 1: Spray the degreaser on your bicycle chain and its accompanying parts
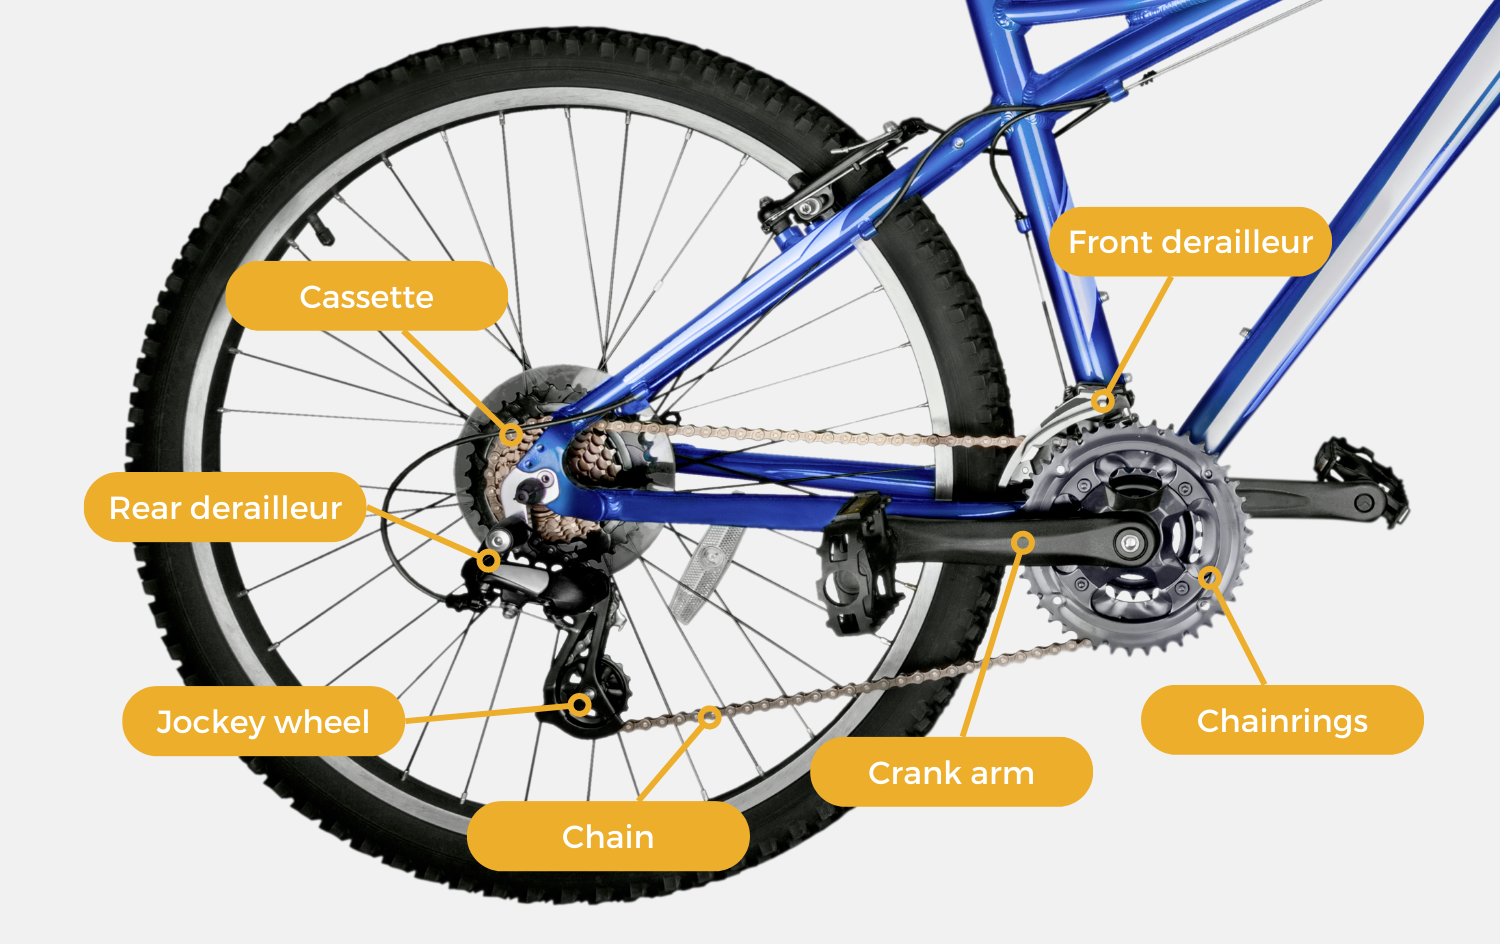
Start by spraying some bicycle degreaser on the cassette, jockey wheel and chain links. If you don’t have a degreaser at home, you can try using Selleys RP7.

Selleys RP7 is a multi-purpose spray that can get rid of grime and displace moisture. It can also eliminate any noisy squeaks coming from your bicycle chain.
Furthermore, the formula can penetrate rust, allowing you to remove it easily. It also acts as a protective layer to prevent rust from forming on the chain in the future.
Note!
Before spraying the degreaser, check if your bicycle chain is equipped with a disc brake. If so, it’s best to cover it before cleaning as contact with a degreaser can cause contamination and squeaky brakes.
If you cannot cover it, try applying the degreaser as far away from the disc brake rotor as possible.
Step 2: Rub the degreaser into the parts with a cloth or brush
Use a cloth or brush to rub the degreaser into the bicycle chain. After which, let the degreaser sit for 5 minutes or longer based on the manufacturer’s instructions.
In the meantime, you can clean the rest of your bicycle with a separate cloth!
Note!
Using a different cloth to clean the rest of your bicycle ensures that the other parts don’t get contaminated with degreaser.
Step 3: Wash the degreaser off with water
Using a hose or a pail of water, gently rinse the degreaser off. Afterwards, check if the chain is clean. If it’s still dirty, repeat steps 1 and 2.
Step 4: Wipe the bicycle chain with a damp cloth
With a clean, damp cloth, wipe the chain to remove any residual degreaser.
Step 5: Dry the bicycle chain with a dry cloth
Grab a dry cloth and thoroughly wipe the bicycle chain to get rid of any moisture. It’s important to do this immediately to prevent rust from forming.
Step 6: Grease the bicycle chain
Carefully drip a drop of lubricant on top of each chain link as you slowly backpedal. Once all the chain links have been greased, continue backpedalling for a few more revolutions to allow the solution to work its way into the links.
After which, wipe off any excess lubricant to prevent dirt from being trapped in your bicycle chain.
Note!
Avoid using motor oil to lubricate your bicycle chain. The formula is too thick and won’t be able to penetrate the smaller parts of the chain. Moreover, it’s sticky and likely to pick up dirt and grit.
Things To Avoid When Cleaning Your Bicycle Chain
Some cleaning tools, equipment and practices can damage your bicycle chain. Read on to find out what you should avoid when carrying out this task!
Avoid soaking the bicycle chain in a degreaser
Soaking your bicycle chain in a degreaser for an extended period of time is not recommended. It can cause the metal to corrode and crack.
Avoid using a high-pressure water cleaner
Using high-pressure water cleaners can cause dirt and grit to become embedded in the bicycle chain instead of removing it.
Avoid using harsh chemical cleaning solutions
Harsh chemical cleaners should be avoided as they can damage your bicycle chain. Instead, it’s recommended to use degreasers or cleaning solutions specifically formulated for bicycles.
Issues To Pay Attention To When Cleaning Your Bicycle Chain
While cleaning the bicycle chain, you can check for potential issues that may affect your ride. Fixing these issues promptly can prevent future complications from arising.
Tight links
Tight links refer to chain links that don’t bend as smoothly as they should. To check for them, slowly backpedal and watch carefully as each link passes through your rear derailleur. If a link skips and makes a ‘click’ sound, it’s likely to be a tight link.
You can confirm this by repeating the same motion at a slower pace, keeping your eye on the suspected tight link. If you notice the skip and hear the ‘click’ again, it’s a sign that the link needs fixing.
How to fix it:
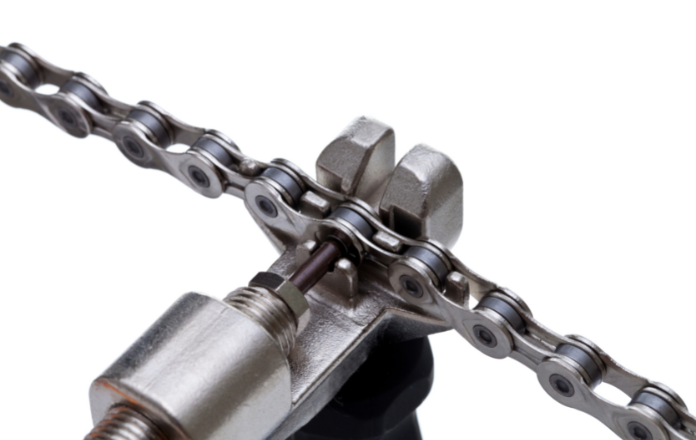
You can fix this issue with a chain tool. Place the tight link over the cradle that is closest to the handle. Turn the handle until the tool’s pin comes into contact with the chain pin and give it another eighth of a turn in the clockwise direction. This should loosen up the tight link.
If you don’t have a chain tool, you can also loosen the link with your hands. Grip the chain on either side of the tight link. Next, gently flex the link sideways in both directions to bow and force the side plates apart. This helps to create clearance to fix the stiffness.
Do this a little at a time, testing the tight link to see if it has loosened. Be careful not to bend your chain!
Chain stretch
Chain stretch occurs due to wear and tear on the inner side of the chain links and in between the link pins and rollers. This causes the chain to elongate over time.
To evaluate the severity of the issue, count 10 chain links and measure the entire length using a ruler. A new chain should measure approximately 25.4cm for 10 links.
How to fix it:
If the length exceeds 25.5cm, we recommend replacing the chain. However, if it exceeds 25.7cm, it’s best to replace both the bicycle chain and cassette.
Rust
A rusty chain can negatively affect the performance of your bicycle. In fact, a severely rusted one can be dangerous because it’s prone to jamming and can cause accidents.
How to fix it:
- After cleaning your bicycle chain, assess the amount of rust that has formed. If there is surface rust or light spotting, you can continue with the following steps without removing the chain. On the other hand, if the chain is severely rusted, you’ll need to remove it from the drivetrain before cleaning.
- Spray Selleys RP7 on the rusted areas and leave it to sit for 5 minutes before scrubbing using a wire brush.
- Next, rinse the chain with water. If you still see rust, repeat step 2.
- Wipe the chain thoroughly with a dry cloth.
- Finally, grease the chain with a bicycle lubricant.
- If necessary, reassemble the chain.
Note!
If you need to remove the chain for cleaning, take pictures of the drivetrain (including the gears and sprockets) from different angles before removing it. This makes reassembly easier.
FAQs About Cleaning Your Bicycle Chain
Should I take my bicycle chain off to clean it?
It’s not necessary to take your bicycle chain off to clean it. However, it can make cleaning more effective. If you wish to do so, you can follow the steps below:
If your bicycle chain has a master link:
Inspect the chain to find the master link. Unclasp it and remove the chain.
If your bicycle chain doesn’t have a master link:
Position the bike chain such that it stretches across two sturdy supports. Next, place a punch tool over a rivet in your bicycle chain. Use a hammer to push the rivet out and separate the chain to remove it from the bicycle.
How often should I clean my bicycle chain?
We recommend conducting quick cleans fortnightly. If you’re an avid rider, consider doing this each time you finish a ride. Thorough cleanings can be done once every 2 to 3 months, while you’re servicing your bicycle.